Thursday, December 17, 2009

hook holder

One of my favorite gifts that I am giving this year is a yarn basket filled with wonderful yarns and books on how to crochet. A girl friend of mine has been wanting to learn, so I thought it would be a perfect gift to help her along. As a finishing touch, I decided to make her a hook holder.

Using dot patterns from Kei, Lecien, Denyse Schmidt, and other various companies I do not know the name of, to back the hooks. The main pattern is one of Echino's new fabrics called Ornament Turquoise, which is just scrumptious in person.
I made a few extra slots, so her collection of hooks has room to grow. To make this holder, I modified the colored pencil roll pattern from the book, Last Minute Patchwork and Quilted Gifts. I love this book, it has so many wonderful ideas in it.

This was such a fun project that I decided to make one for myself. Currently my hooks live on the bottom of whatever bag my yarn is currently shoved into, so this was a necessity for me. I think I just need to learn to make everything in pairs, one to give away and one to keep. I know that is a bit selfish, but it's hard not to fall in love with the things we make.

Tuesday, December 15, 2009

Good morning everyone, I am so sorry that this is coming a day late....sadly the stomach flu hit my baby girl, and yesterday was spent in a sea of vomit. She is feeling better today, but still running a fever, so we aren't out of the woods yet. I hate it when my babies get sick, especially her because she is so young.

Our lucky winner is.....number 3, Aneela of Comfortstitching, who said:
do I want a potholder.........I think I need yours!!
It would look lovely hanging up in my kitchen:)

Aneela, I will email you to get all your info, I hope you enjoy your new potholder!!

True Random Number Generator
3Powered byRANDOM.ORG

Wednesday, December 9, 2009

first giveaway

My Guild meets once a month, and I really look forward to these meeting......there's nothing like being in a room of amazingly talented women who all love what you love. This months meeting was to include a Holiday pot holder swap. So on Monday, I was all ready with my potholder to go to my meeting, when my husband called letting me know that he lost his keys on one of his job sites and was stranded. So at the last minute, I had to cancel going to my meeting to bring that sweet hubby of mine the spare keys to his car. It was somewhat comical because I am the type of person who looses her keys (and have on many occasions) but my husband is not. He is far to on top of things to loose his keys....I blame it on the rain!! Needless to say, that leaves me with a potholder that needs a home, so I decided to turn it into my first blog giveaway.

Who is this giveaway for....well my wonderful followers of course. I can't tell you how much I have enjoyed becoming part of this amazing online quilting community, and truly appriciate the comments left by all of those who stop by my blog. So if you are one of my followers and are interested in adding this potholder to your kitchen, then just leave me a comment. If you are not a follower of mine, then you can take part by becoming one and leaving a comment too! I will use the random number thingy magigy to pick a winner on Monday, December 14th. Good luck to all, and thank you for your support!!

Thursday, December 3, 2009

a little girls quilt

I finished the little girls quilt for Give a Kid a Quilt, and although the design is a simple one, I really like it. I think what makes me like it is the Joel Dewberry fabric in the center.....I adore those birds, too cute!. I will have to make a quilt for my daughter with that fabric someday. Some of the other prints include Heather Bailey and Amy Butler.

Now that I have both quilts done, I need to make a trip to the post office. I am really hoping that these two quilts find their way to their owners before Christmas.

Wednesday, December 2, 2009

quilting for a purpose

While sipping on my extra hot Chai tea latte last week I stumbled upon something that really touched my heart. I was on the sometimes crafter's blog reading her feelings on an important issue...homeless children. I followed her link to the blog, Give a Kid a Quilt organized by Rachel (from 2nd avenue studio) and Christina (the sometimes crafter).....after reading for a few seconds, I knew without a doubt that I wanted to be part of this amazing idea. They are collecting quilts to donate to homeless children, ok.....homeless children. I don't know if those two words hit you the way they did me, but just the thought makes my heart ache. So I immediately responded and told them to count me in. All other projects were put aside and I got to work!!

The reason I started quilting was to make something for my children that would represent me throughout their lives....something that would keep them warm and feeling safe when I couldn't. I get the most wonderful and fulfilling feeling when I make a quilt for someone that I love. What I learned this week is that I get that same feeling from making a quilt out of love for someone I don't know. I enjoyed making this one so much that I have decided to do another. This quilt was made with a little boy in mind, the next will have a little girl in mind.

I used some of my stashed fabrics for this quilt. The green dots are by Westminster, the orange and brown are from Denise Schmidt's Katie Jumprope line, the blue dots are Kei, the multi colored dots are by Alexander Henry and lastly the grey mushrooms are by Jay McCarroll. I am hoping that, when this quilt finds it's way to the little boy it is meant to belong to, it will supply him with warmth, comfort and hopefully a bit of safety.


Tuesday, November 24, 2009

sewing machine cover tutorial

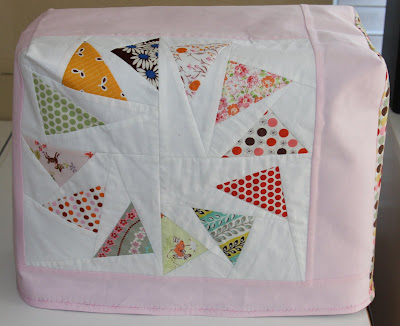
Ok....here it goes. Keep in mind this is my first time writing up a tutorial, so if you need more info or have questions, just let me know. I am a very visual person, so for the sake of this tutorial, I made a second cover for my daughters sewing machine. She plays with my old Kenmore with the needle removed, and loves every second of it....she doesn't even realize that she isn't really sewing!!

What you need:
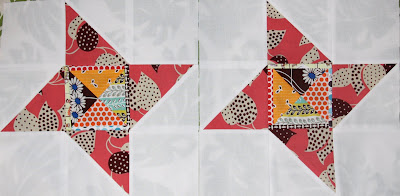
-decorative block (if you want to use the flying geese, like mine, the tutorial for that block it here)
-about a 3/4 yard of fabric, you can piece use smaller pieces and just sew them together
-20" wide fusible interfacing (I used SF-101 by Pellon) enough to match the measurements of your sewing machine. I used about a yard.
-thread to match your choice of fabrics
-marking pen/straight pins

First you need to find the circumference of your sewing machine. I would recommend measuring at the bottom of your sewing machine, a lot of them are wider on the bottom. This machine is 40.5" around the bottom.
The second measurement you want is the height of your machine.

Like my son is demonstrating in this picture, you want to measure from one side over the top to the bottom of the other side. This machine's height measures at 25".

The first measurement will be used to determine the width of your fabric. You want to take the circumference of the machine divide it 2 and then add an inch for seam allowance. For example: this machine measured 40.5" divided by two is 20.25", I then added an inch for 21.25" as the final width measurement of my fabric. The height measurement will let you know how long your cover needs to be. I added an inch to this also.

Before cutting your fabric, you need to decide where you want your decorative block to be located. On my daughters cover I decided to center the decorative block, but on my original cover I offset the decorative block to the left. The decorative block is 11.25", each side panel is 5" wide and 26" long. I chose to put 2.75" of fabric underneath my block. Again, my decorative block is 11.25" + 2.75" below+ a 12" panel above the block to equal my needed length of 26".

I attached the top and bottom panels to my block first. Then the side panels.

Once my cover fabric was assembled, I ironed it to my fusible interfacing. I used interfacing to make my cover stiffer, but you could also choose to make an inner lining, if you wanted a softer look.

Then simply fold your cover in half and sew up both of the sides the sides together.

Then while wrong side out, slip the cover over your sewing machine to pin the corners.

Pin your corners down to the top of your sewing machine. Then slip the cover off and mark your sew lines on your two corners.

Once your corners are sewn closed, trim off the excess leaving a .25"seam.

Turn your cover right side out finish of your cover bottom by folding over the raw edge and pining it in place.

You can use any stitch you desire to finish off your edge, I chose decorative stitches to add a little added touch to my covers.

Your cover is now complete and ready to keep all that unwanted dust off of your treasured machine!

As a side note: I was asked for the measurements of the original cover I made. To be honest, when I made my original cover I did it all by eye, so don't have them. I added in the measuring techniques for this tutorial, with my son's help.


Monday, November 23, 2009

one more check off the list


Since I am at a stand still with my HST quilt, I decided to get one of my Christmas list quilts done. I'm having a hard time staying focused on my Christmas sewing list, seeing as it is sunny and warm outside. It's one of the things about living in southern California that I will never get use to, every year I have to force myself to get holiday things done, because it never really feels like the holidays. I think it was all those white Christmas mornings in New York as a child that makes me associate Christmas with snow and cold. I successfully got myself into the mood last week, and am glad to have another check off on my list. A quilt for my sister....who has very different taste than I do. In order to make this quilt a reflection of her style, I had to go outside of my comfort zone and use red. The red fabric used is Kona cotton in Crimson.....and not at all a color I would ever choose to work with. I just kept telling myself "It's not for me, it's not for me". The layout of the quilt was inspired by one of my fellow guild members Terri and that part of the quilt I love. I will have to make one of these large wonky blocks, using only colors that I love, one day. I think it would be a good design for one of my boys.

I had a few request for a tutorial on my machine cover, I am hoping to have that finished and up by tomorrow. It will be my first tutorial and I want to make sure I take my time to do a good job.....I'm a bit nervous, but it is a really easy project, so the tutorial should be easy, right?!?!

Wednesday, November 18, 2009

a new cover and some random things

I saw my first "geese in a circle" block the other day on Kerri's blog, Lovely Little Handmades, the other day....and needless to say, I was in awe!! I immediately followed her link to the tutorial by the Sometimes Crafter, and made one of my own. Once made, I had to find a purpose for it...with some quick sewing and about and hour of time, my Bernina had a new cover!!

I was able to make the whole cover using scraps left over from my last quilt, including those wonderful Alexander Henry dots that I am obsessed with.

Now Nina doesn't have to worry about dust anymore!!
As for the rest of my time, I have started a new quilt. That is, I have spent quite a bit of time sewing up some HST squares.

I am waiting on the post man to bring me the last 2 fabrics I ordered for this baby....it will be my first time quilting with HST squares, so I am pretty excited.
On another random note: I have a new obsession....Sulky 100% egyptian cotton blendables thread.

Before getting my Bernina, I always quilted in white....mainly to hide the fact that my old machine never stitched constantly. Now, my stitches are all even, and showing them off has become fun. These Blendables are nice, subtle, and add such a wonderful touch to my quilts. Like all things I become obsessed with, I need them all!!!

Monday, November 16, 2009

in love...

OK, I admit it, I am in love. I didn't really know who I was making this quilt for, I just knew I wanted to make it. I fell in love with all these patterns when I made my daughter's apron, and decided then that I would eventually make a large quilt with them. Now that it is done, I know that it is MINE....ALL MINE!! Yes, I know I should give it to my daughter, but I love it!!

Because of the size of this quilt, 68x72, it was kinda hard to photograph the entire thing alone. Normally I would have that tall husband of mine hold it up, but he is at work, and I just can't wait to share!!

Now, even though this front turned out exactly how I had pictured in my mind, the back is actually my favorite part of this quilt.

Originally I had planned to have a solid backing on this quilt, but at the last minute changed my mind and threw this together. I adore the way it turned out. To top it all off, I had found these wonderful dots at my visit to Purl Soho last week!! They are from Alexander Henry, and are absolutely delicious, not to mention a perfect binding for this quilt.

The only complaint I have is the type of batting I chose to use. I decided to use Quilter's Dream batting for the first time....why I would try a new batting on a quilt like this, I don't know. It is soft, and great to work with, but when washed it crinkles A LOT!! Since this is such a geometrical design, I don't really like the crinkle effect that it has, but alas it is too late to change that!! So just to let all you know who haven't used that batting before, only use it if you want a lot of crinkle, and when I say a lot, I mean A LOT. I pressed it down after washing it so it photograph better, and I still think it is too crinkled.

Friday, November 13, 2009

block party quilt along

These are my first two blocks for the Block Party Quilt Along. This is the first quilt along that I have participated in, and with the first block assignment, I did something new. I haven't done a star block before, or one so traditional. When I first saw it, I wasn't too sure how much I would enjoy making it....but it didn't take me long to figure out a way to make fun and a reflection of me.


I love the fact that even though these two blocks are identical, turning them in different directions really sets them apart from one another. I enjoyed making these blocks so much that I can't wait til the next block assignment!!!

You can see all the blocks being made at the Block Party flickr group.


Thursday, November 12, 2009

Belle


This week has been quite a hectic one, football season is coming to an end, and my daughter in discovering the world around her.....so needless to say, there hasn't been much sewing around here. I did manage to squeeze in completing this lovely embroidery pattern that I purchased from Aneela over at Comfortstitching. Her name is Belle, and my daughter fell in love with her while sitting on my lap reading Aneela's blog. Belle had to go blonde, to match my baby, and per my baby's request her dress had to be pink. I am thinking that Belle will find her way into a baby quilt for Izzy as soon as I get a chance to spend some quality time with my sewing machine.

Wednesday, November 4, 2009

quick and easy


Yesterday I was feeling the need to finish something. I get a bit antsy when I go to long without feeling that moment of accomplishment that I only get from completing a project. I had seen this cute bag tutorial over at Pink Penguin and decided to give it a whirl. It was the fix I was looking for...fun, easy and best of all quick!! I changed the size dimensions and came up with my own patchwork design to give it that personal touch.
I love it, and so does my baby girl. She snatched it out of my hands as soon as it was done, and claimed it as her own. I was unable to picture it before she confiscated it (and she was not willing to give it up), so you get the in use pictures today...instead of the laid out and made pretty pictures.

For some reason she filled it with all her little dishes that live in her kitchen, and was very pleased to have done so. It gave me the idea of making her cloth shopping bags that she can play with, which went on next weeks list of things to sew!

As for the quilt I am working on right now, well it's coming along very slowly. I decided to stay up late last night, after my family was nicely tucked into bed, and get the basting done. I have to move all the furniture in our living room to do this, so it goes much smoother in the quiet hours of night. Here is a sneak peak, don't mind the bad lighting, as I said, it was late.

Hopefully I will have it all quilted and binded by the weekend.


Monday, November 2, 2009

block party

The girls over at Block Party are turning they're quilting bee into a quilt along! Outside of that, there is a lot of exciting things going on over in that part of the world. Alissa from Handmade by Alissa is co-writing a book with Kristin of Unraveled, in which the blocks and the world of modern quilting will be featured. I had the great pleasure of meeting Alissa last month at our first LA Modern Quilting Guild meeting. Not only is she incredibly talented....but wonderfully inspiring to be around. This book is sure to be a creation full of excitement and love for modern quilting. To kick off the quilt along they are having an incredible give-away full of beautiful fabrics.
Give Away Fat Quarters
P1090819
I am so excited to see what our first block will be, and what amazing things come from everyone who participates.

Sunday, November 1, 2009

Honey-bee

I couldn't resist sharing a picture of the cutest little honey-bee that graced my garden yesterday. She was feeling much better and smelling the flowers before flying off to find candy...


We did finally catch her and put her to bed after hours of flying around the neighborhood spreading cheer and joy!

Friday, October 30, 2009

organized chaos


My next quilt is underway, but before I started, I had a bit of organizing to do. My family thinks this looks more chaotic than organized....but it is....organized that is! I am working with all my favorite fabric scraps, which I have been wanting to do for a while now. Sadly, my daughter isn't really up to sharing me with the sewing machine this week, so it is coming along very slowly. I think she is catching a cold and feels a bit more needy right now and naps aren't coming as easily these days. Maybe I will pull some late nights this weekend to get it done!!

Tuesday, October 27, 2009

a patterned quilt

Like most quilters, I am fully self taught. Up until about 4 months ago, I didn't even know what the names of different types of quilts were, or who Heather Ross, Denyse Schmidt, and Amy Butler were. Then I discovered flickr and the world of blogging. I have learned so much in the last few months about HST quilts, block quilts, log cabins...etc.
I do feel though that since I learned in the dark ages of no classes, books, or computer (not even a friend to learn from), there are some basics of quilting that could make my life easier (like basting with safety pins instead of straight pins...who knew). With that said, I gave myself the challenge of completing a quilt by pattern. I chose an Amy Butler pattern, from her new Softwares cd.
The name of this quilt is Aspen Branches...and I loved the pattern from the moment I saw it.

I do need to tell you that I did make some changes as I went. For example, the pattern has the stripes meeting in the middle on the seams, but I decided to off set them so that they wouldn't line up. The pattern only called for 9 different fabrics, I used 26. I also ended up putting on a boarder that was not called for. In all honesty, I can tell you that I did learn one thing....I don't like following patterns. I had a hard time being confined. I do love the quilt, and think it looks nice in its new home....

but I did not enjoy the process like I normally do. There is something to be said for going at it on your own and making up the rules as you go.
I love my blog reads and flickr addiction....I feel as though I learn so much more from reading blogs than I could ever learn from a pattern, in a class or a book. Besides, the talent found through these two sources is so amazing and inspiring...that I have a list a mile long of things I want to try. I am still determined to do Denyse Schmidt's Single Girl quilt, one day (I want to make it for my daughter's hope chest) and I am sure that there will be tempting patterns in the future, but on the whole it's just not my thing. I like trying to figure things out, and spending countless hours deciding where a block or fabric goes. It was a good experience though, and now I can say that I did it!! I am curious what everyone else's thoughts are on the subject.

As requested, a picture that shows the entire front of the quilt!! It has been used a lot since I originally posted this quilt, so it is a bit wrinkled.

Tuesday, October 20, 2009

carry all

This month was the first meeting of the LA Modern Quilt Guild, and I am so excited to be part of this incredibly talented group of women. We all decided that next month we would bring a quilt to share with the group....so naturally my first thought was "I am going to need a carry all bag to drag to and from meetings". I received my new Amy Butler Love fabric last week, and couldn't resist using it for this project.

The pattern used for this bag is from Amy Butler's new Softwares project cd. I fell in love with the pattern because of the two different sized handles, so convenient. The eyelets were not called for in the pattern, I added those on, just to give it a more finished look.

I also love how big it is, measuring 15 x 16.5 inches, when finished. To take the picture, I folded two throw size quilts and stuffed them inside....they both fit in easily. I do think that maybe a large floral pattern might have looked better on this bag, but there's nothing to be done about that now!!


Friday, October 16, 2009

peace quilt

My niece is 15 and her style is somewhere between bohemian and the days of peace signs and free love, you know the 60s. So my goal, to make her a quilt that would capture the feel of both of these worlds. As soon as I saw AMH fabric, I knew that it was a perfect match...bohemian for sure, but it needed a little something to give it that hippie feel.

I think that the peace signs were the perfect answer!


I decided to let all the patterns touch and intersect in order to keep it a bit more organic and colorful. All my left over scraps were used to make the binding, and I love the way that it blends into the pattern of the quilt. Once again, I used variegated thread for the quilting, and it really added to the feel of this quilt.

I am a machine binder, and usually end up with a clean stitch on the front edge of my binding, which looks nice, like I said, clean...but I have been wanting to perfect attaching the binding to the front first, that way the stitch would be on the back. I have tried over and over and had not found a perfect solution. Luckily, this world of blogging lets us learn from others and Red Pepper Quilts had the remedy for my dilemma. She had given the tip of stitching in the ditch on front of the quilt to catch the fold on the back....works like a dream!

This is the end result, I love it, and am SO thankful that she shared this wonderful tip.